We are starting a series of articles about managing trades called Trading Journal. The series will cover the creation of a trading journal, where the user can manage their trades, from many different markets. The first article is about internationalization, where we will create a NextJs project with multi languages support.
Table of contents
Open Table of contents
New NextJs Project
First, of course you need to have a NextJs project ready to implement the internationalization. If you don’t have one yet, you can create a new one with the following command:
npx create-next-app my-appInstall next-intl
The library that we are going to use to implement the internationalization is next-intl. You can install it with the following command:
npm install next-intlProject Structure
This is going to be the structure of our project, a couple of configuration files and a folder for the translations, and some pages to test the internationalization.
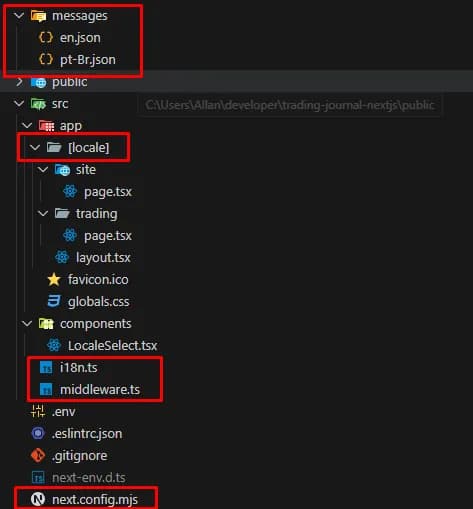
Make sure about the files/folders marked in red, they are the most important for the internationalization to work.
Pay attention to the folder [locale] this is how NextJs knows which locale to use, based on the path url.
Source Code
Inside ~/messages/en.json:
{
  "hello": "hello world",
  "trading": "Trading",
  "english": "English",
  "portuguese": "Portuguese"
}
Inside ~/messages/pt-Br.json:
{
  "hello": "Olá Mundo!",
  "trading": "Negociação",
  "english": "Inglês",
  "portuguese": "Português"
}
For the file ~/src/i18n.ts:
import { getRequestConfig } from 'next-intl/server';
import { notFound } from 'next/navigation';

const locales = ['en', 'pt-Br'];

export default getRequestConfig(async ({ locale }) => {
  if (!locales.includes(locale as any)) notFound();

  return {
    messages: (await import(`../messages/${locale}.json`)).default,
  };
});
For the next config file ~/next.config.mjs:
import createNextIntlPlugin from 'next-intl/plugin';

const withNextIntl = createNextIntlPlugin();

const nextConfig = {
  async redirects() {
    return [
      {
        source: '/',
        destination: '/site',
        permanent: true,
      },
      {
        source: '/en',
        destination: '/en/site',
        permanent: true,
      },
      {
        source: '/pt-Br',
        destination: '/pt-Br/site',
        permanent: true,
      },
    ];
  },
};

export default withNextIntl(nextConfig);
The redirect is used to redirect the user to the correct locale based on the url path. In this case if there is no locale in the url, it will redirect to the default locale, and if there is no path it will redirect to the site page.
This file is responsible for loading the translations based on the locale.
For the middleware ~/src/middleware.ts:
import createMiddleware from 'next-intl/middleware';

export default createMiddleware({
  locales: ['en', 'pt-Br'],
  defaultLocale: 'en',
  localePrefix: 'always',
});

export const config = {
  matcher: ['/((?!api|_next|.*\\..*).*)'],
};
This file is responsible for setting the locales and the default locale. The matcher is used to exclude the locales from the api and the next files. The property localePrefix is used to always include the locale in the url path.
The component for the locale select ~/src/components/LocaleSelect.tsx:
'use client';

import { useTranslations } from 'next-intl';
import { usePathname, useRouter } from 'next/navigation';

const locales = [
  {
    locale: 'en',
    label: 'english',
  },
  {
    locale: 'pt-Br',
    label: 'portuguese',
  },
];

export default function LocaleSelect() {
  const t = useTranslations();
  const router = useRouter();
  const pathname = usePathname();

  const currentLocale = locales.find(
    (locale) => locale.locale === pathname.split('/')[1]
  );

  const handleChange = (e: any) => {
    const nextLocale = e.target.value;
    if (!pathname) router.push('/');
    const segments = pathname.split('/');
    segments[1] = nextLocale;
    router.push(segments.join('/'));
  };

  return (
    <select
      value={currentLocale?.locale}
      onChange={handleChange}
      className="border border-gray-300 rounded-md"
    >
      {locales.map((locale) => (
        <option key={locale.locale} value={locale.locale}>
          {t(locale.label)}
        </option>
      ))}
    </select>
  );
}
Here we will not only select the locale, but also change the url path based on the selected locale. The select component will also select the current locale based on the url path. Be aware that this is a client side component, so it will only work on the client side, hence the ‘use client’ comment at the top of the file.
For the main layout ~/src/[locale]/layout.tsx:
export default async function RootLayout({
  children,
  params: { locale },
}: {
  children: React.ReactNode;
  params: { locale: string };
}) {
  const messages = await getMessages();
  return (
    <html lang={locale}>
      <body
        className={`${inter.className} flex flex-col items-center mt-10 gap-4`}
      >
        <NextIntlClientProvider messages={messages}>
          <header>
            <nav>
              <LocaleSelect />
            </nav>
          </header>
          <main>{children}</main>
        </NextIntlClientProvider>
      </body>
    </html>
  );
}
You need to include a url param to the layout file, this is how NextJs knows which locale to use. Next you need to bring the provider from NextIntl so the whole application can use the translations. I added a bit of inline style to the body tag, just to make it look better.
Now we can call the translations in the pages, for example in ~/src/[locale]/site/page.tsx:
import { useTranslations } from 'next-intl';

export default function Page() {
  const t = useTranslations();
  return <h1>{t('hello')}</h1>;
}
And ~/src/[locale]/trading/page.tsx:
import { useTranslations } from 'next-intl';

export default function Page() {
  const t = useTranslations();
  return <h1>{t('trading')}</h1>;
}
Result
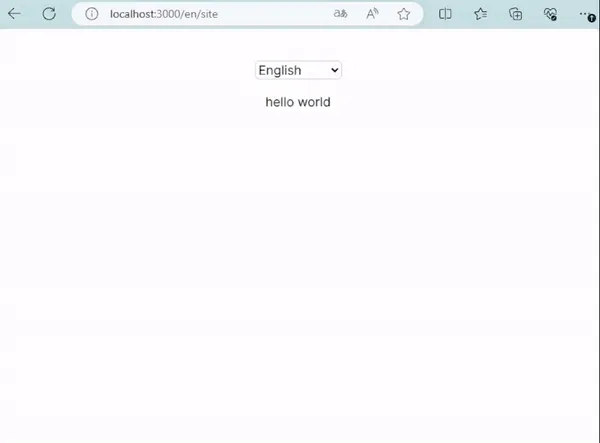
At the end you should have something like this: